[Encore!] 100 REPS A DAY TO B STRONG 10 DAY CHALLENGE

WE MADE IT!!

Congratulations on completing the 10 Day Challenge! Now… how do we keep this momentum?!

As I wrote about on Day 10:

consistency + progression = results

So let's talk about how you can progress this program [the 10 day challenge] to continue your journey to B Strong. B Well. B Bold. You can stack the challenge workouts together! And you can do it however you want! Stack 2... stack 4... repeat the same workout multiple times to add up to 200 or even 300 reps. You've got options to experiment with! Here are some examples:

Day 1 + Day 2 + Day 3 = a challenging, low impact, total body mat workout.

Day 2 + Day 4 + Day 8 = a lower body workout that follows the format I use for strength workouts in the B Strong App: warm-up + workout + burnout.

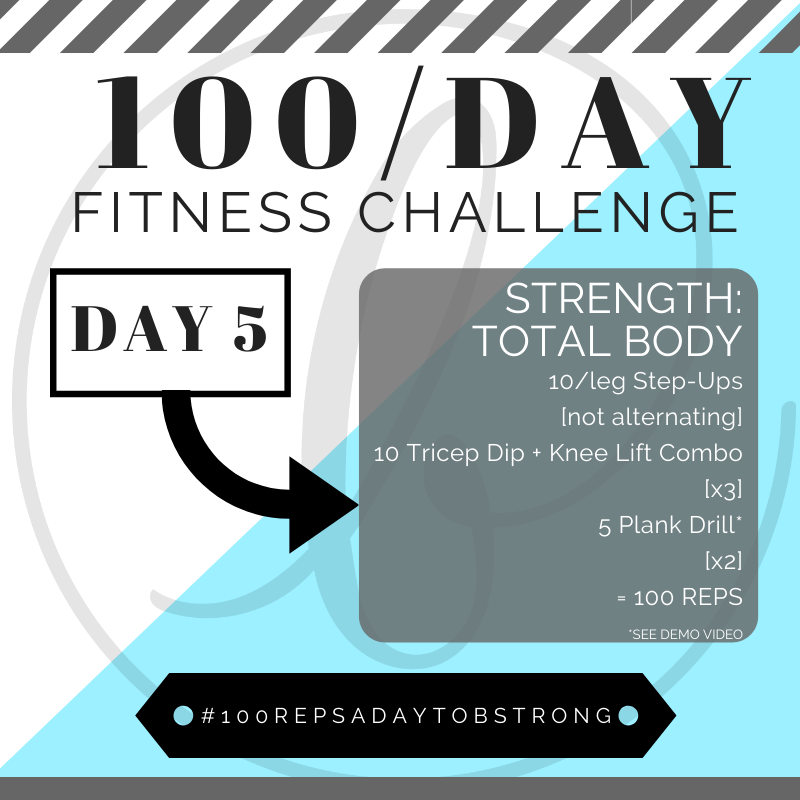
Day 4 + Day 5 + Day 6 = a challenging, low impact, total body strength workout.

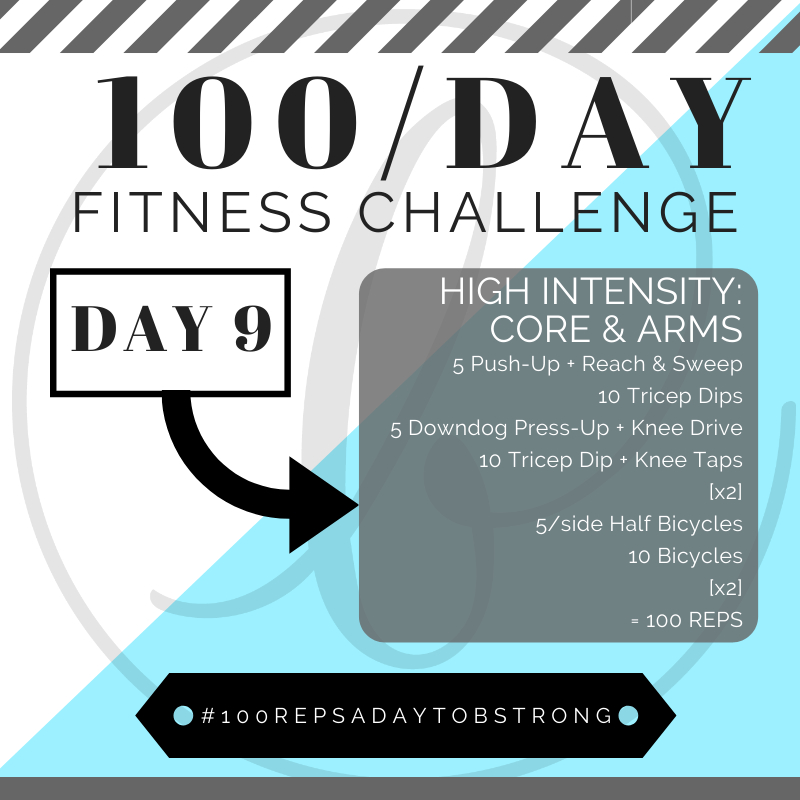
Day 8 + Day 10 = an efficient, effective HIIT workout!

Scroll through & click on the images of each workout below to easily access them! [And be sure to share your favorite “workout stacks” with the entire squad by using the hashtag #100RepsADayToBStrong!]

I truly hope you enjoyed this challenge, learned some helpful information, plan to save these workouts to revisit in the future & want to share it with people you care about!! If you ever have any questions about how to reach your goals or how certain movements affect your body, please don’t hesitate to ask!

Want to start a full B Strong Fitness Program?! Check out the B Strong App! If everything up until Day 7 was more your speed, you’ll love the Health B Strong Fit Club. If you loved the intensity of Days 7-10, then you’ll love the Fitness B Strong Fit Club. And if you’re looking for a personalized program, then you should check out the Custom Training Packages I also offer through the app!

Sending you all the praise & positive vibes after completing the 10 Day #100RepsADayToBStrong!!!

B Strong,

Cassie B.

[Day 10] 100 REPS A DAY TO B STRONG 10 DAY CHALLENGE

DAY 10 - HIGH INTENSITY - TOTAL BODY 2.0

CHALLENGEDAY10.png

It’s the last day & to close out this challenge, we're GOIN' HARD!

We've seen similar exercises before, so let's talk about PROGRESSION:

The way that we build strength & improve our fitness is to consistently perform the same exercises while occasionally progressing them. You can progress exercises by:

  • adding resistance

  • performing more reps per set

  • completing more sets

  • changing your movement tempo [sometimes moving slower is more challenging, while other times moving faster is more challenging]

  • finishing the same amount of work in less time [i.e. doing the workout that took you 30min last week in just 25min this week]

  • increasing your range of motion [i.e. squatting deeper]

  • focusing on your mind/body connection [really squeezing the muscles you're trying to work]

If you look back at the workout from Day 7 , you'll notice that I've taken all of those exercises & progressed them! For the plank drill, I replaced the shoulder taps with plank marches; for the step-through lunges, I added a plyometric [powerful/explosive] element by adding the switch jump; for the mountain climbers, I increased the number of reps; & for the high knees, I replaced them with a drill that's higher intensity, requires more coordination & challenges your agility.

Progressing the exercises in your workouts every 2-4 weeks is essential for earning results. Likewise, consistently doing the same exercises for at least 4 weeks is equally as important. So the pressure to "mix it up" & "keep your body guessing" can be a little misleading. No, we definitely don't want to keep doing the same exercises with the same approach week after week, month after month... but if we lack any sort of consistency, we won't earn results as efficiently as possible.

So if today's workout is a little too much, do the workout from Day 7 instead! And repeat that workout 1-2x per week until you're able to bang this one out!

[Day 9] 100 REPS A DAY TO B STRONG 10 DAY CHALLENGE

DAY 9 - HIGH INTENSITY - CORE & UPPER BODY

challengeday9.png

*You always have the option to replace regular push-ups with Hand-Release or elevate your hands on a higher surface if that's more doable for you!

To revisit proper form:

Planks & Push-ups: Day 3

Tricep Dips: Day 5

Core exercises: Day 1 for avoiding neck pain & Day 6 for avoiding lower back pain.

Yes, the purpose of today's workout is to strengthen your arms & core, but I have another goal in mind too: chest & shoulder mobility! Mobility, simply put, is your body's ability to move comfortably, without discomfort or limitations.

When I program workouts, I always make an effort to sprinkle in movements that help to preserve or even improve our mobility [i.e. the Reach & Sweeps done between push-ups, the downward dogs, & even tricep dips are amazing for opening up our chest]! So, after you complete today's workout, while your body is warm & your neck & shoulders are loosened up, I highly recommend taking a couple minutes to stretch out your chest, neck & shoulders. You might be surprised to see how reducing physical tension in your body can help alleviate mental & emotional stress too.

Ok, let's do this squad!!!

[Day 8] 100 REPS A DAY TO B STRONG 10 DAY CHALLENGE

DAY 8 - HIGH INTENSITY - LOWER BODY

challengeday8.png

Let's talk AGILITY!

What is it??

  1. the ability to change directions quickly without straining your muscles or stressing your joints.

  2. not just a skill for athletes.

  3. definitely not something you get “too old” for so long as you continue to move independently.

“Cassie, I just can’t keep up! It’s not even ‘cause I’m outta breath, I just can’t move that fast!!”

I hear ya! Try these tips & see if you’re able to speed up! ;-)

  • Stay grounded!! As counter-intuitive as that may seem, in order to move so fast it looks like they’re floating, athletes are literally using the ground as the equal & opposite force that allows them to propel themselves with the amount of power & speed that they do. Stay grounded.

  • Staying grounded means bending your knees to keep your center of gravity low.

  • Bending your knees means you should be hinging your hips - booty back, head forward, spine straight - so that your center of gravity is centered over your feet. If your center of gravity gets too far in front of/behind your feet, you’ll be off balance & unable to move as swiftly.

  • Engage your lats [un-shrug your shoulders] & pull your abdominals tight so that you’re not puffing your rib cage out.

  • BREATHE!!!

NOTE: if jumping is too much impact on your joints, replace the Squat Jack + Jumping Jack Combo with regular, bodyweight squats.

This workout is TOUGH - but so are you ;-) It's time to work!

[Day 7] 100 REPS A DAY TO B STRONG 10 DAY CHALLENGE

DAY 7 - HIGH INTENSITY - TOTAL BODY

challengeday7.png

So let's talk about the proper form for keeping these step-through LUNGES under control:

  • Both knees bend to about 90-degrees so that the shin of your back leg & thigh of your front leg are both parallel to the ground.

  • Front foot: flat & you’re driving your heel down into the ground as you stand upright.

  • Back foot: only your toes are on the ground, but make sure it’s all 5 toes & that your foot isn’t twisting so that only your big toe or little toe is on the ground. In addition, actively lift that heel & bend your shoe because...

  • Back knee: should tuck forward so that it’s directly beneath your hip. As you lift that heel & bend your shoe, tuck your back knee forward until you feel your quads on that leg [front of thigh] & abs engage rather than your hip flexors hyperextending!

  • Keep your hips square: avoid letting the hip of your back leg twist back behind you & open your pelvis to the side - it should always face forward.

  • Keep your feet hip width! This is where a mirror comes in handy. Avoid "standing on a tight rope" with one foot directly in front of the other. Your feet should remain in line with their respective hips.

Mountain Climbers: you're essentially doing high knees while holding a plank. Drive your knee forward & under your torso rather than kicking your heels toward the sky. And be sure to keep your shoulders stacked over your wrists! If your shoulders shift back, your booty will lift & then your abs aren't getting much out of the movement anymore [&, in turn, your neck & shoulders will take on unnecessary tension].

High Knees Pro Tip: With any sort of running, your arms set the pace. The faster you pump your arms, the faster your feet will follow. Use that to push yourself to a SPRINT pace! [Keep in mind that "10 High Knees" means 10 PER knee!!]

Ok, you're ready as you'll ever be!! Let's do this!

[Day 6] 100 REPS A DAY TO B STRONG 10 DAY CHALLENGE

DAY 6 - CORE STRENGTH & UPPER BODY STABILITY

CHALLENGEDAY6.png

Does your lower back KILL when you’re doing ab exercises where you lay on your back & lift your legs??

  1. Keep your pelvis properly aligned!

    When the front of your pelvis drops down, your butt sticks out & low back arches. When the front of your pelvis lifts up, your stomach crunches & your butt tucks underneath you. If the 1st one is happening, that’s when your back is going to strain [ouch!]. When laying on your back, before you begin the movement, 1st pull your belly in & press your lower back toward the floor to tilt the front of your pelvis upward. From there, your goal is to hold your pelvis in that position as you go through the motions with your legs!

  2. Squeeze your butt!!

    Squeeze your butt cheeks right now & see what happens - yes for real, LOL - the front of your pelvis tilts upward! Exactly what we just went over above! So... use your abs AND your booty at all times & definitely remember to use your butt as your legs get lower to the floor - that’s when keeping your pelvis neutral is most challenging for your abdominals.

  3. Your range of motion should be as big or small as your strength will allow!!

    Does lowering your legs to hover just inches off the ground make your lower back arch no matter HOW HARD you try to do steps 1 & 2? Then don’t go as low! If you can only keep your abs engaged up until you’ve lowered half way, then that’s how much you can move for now! And your range of motion WILL get larger! I promise!! So long as you commit to proper form so that you actually strengthen your abs ;-)

Applying these techniques is not only a game changer, it’s CRUCIAL in order to earn results from your hard work!! Now go get 'em tiger!

[Day 5] 100 REPS A DAY TO B STRONG 10 DAY CHALLENGE

DAY 5 - STRENGTH - TOTAL BODY

challengeday5.png

Alright, let's breakdown the focus & form of each movement!

Step-ups: work our legs & booty!

  • If you're using a chair, prop it against a wall so that it doesn't move & cause an accident!

  • Step your entire foot onto the chair/bench you’re using. Don’t let your heel hang off the edge.

  • Drive your heel down into the step as you stand - that way you’re engaging your glutes & not straining your knee.

  • Also, as you step up, focus on using the leg of your elevated foot to pull your body forward & upward instead of pushing off of your back foot.

  • The step upward isn't the only important part though! Controlling the step down will work your glutes & thighs double-time.

Tricep Dips: work the group of muscles on the backside of our arm!

  • Fingertips face your body

  • Bending your knees to flatten your feet on the ground will give your arms some assistance [& you can 100% do that even with the leg lifts]

  • The more you extend your feet forward, the more challenging it’ll be.

  • Keep your lats engaged & your neck long! [See how my neck hasn’t disappeared in this photo? Neither should yours!]

  • Hug your elbows toward one another so that they point back behind you as they bend. Avoid letting them bow out to the sides - not great for your wrists & elbows.. [ouch!]

  • Bend your elbows to 90-degrees with each rep. Humping the air is NOT a tricep dip - hahaha - [refer back to the 2nd & 3rd tips if you’re struggling with this!]

Plank Drill ["Walk the Plank"]: works our core, shoulders & chest!

  • Do your best to keep your pelvis squared up with the ground as you march down to your forearms & up to your hands [the less your hips twist, the more you're working your core]!

  • The wider you put your feet, the easier it is to keep your hips from twisting when you march.

  • Keep tabs on the position of your hips too: 1. if they're poking up toward the sky, that will move the tension out of your core & into your neck & shoulders; 2. if they're sagging toward the floor, that will move the tension out of your core & into your lower back.

That's all folks! Get ready to get sweaty!

[Day 4] 100 REPS A DAY TO B STRONG 10 DAY CHALLENGE

DAY 4 - STRENGTH - LOWER BODY

CHALLENGEDAY4.png

Let's talk about the proper form for SQUATS

  • Hinge your hips: booty back, head forward, spine straight!

  • Sit your behind back enough to load the heels of your feet with the majority of your weight, but you don't have to lift your toes of the ground - they help with balance!

  • Keep your lats engaged AND your abdominals tight so that your rib cage isn't puffing out.

  • When you stand up, tuck your pelvis into a neutral position [no arching or rounding of your lower back].

  • When you stand up, be sure you're standing upright. If you stay leaning slightly forward, 1st off, you haven't tucked your pelvis into a neutral position & 2nd, that could cause tension in your lower back.

And the proper form for LATERAL LUNGES

I love these because they're efficient! We're getting so much accomplished with a single movement:

  1. They work the inner AND outer thigh, along with the booty of your bent leg

  2. They challenge your core stability [because it’s hard AF to keep your posture in check when you’re moving sideways - “laterally” - AND each side of your body is doing all kinds of different stuff hahaha!]

  3. They also stretch the inner thigh of your straight leg.

Here’s what you need to do in order to make sure you’re loading your muscles & not your joints/back so that you’re building strength instead of creating tension that could cause you pain:

  • The foot that steps side is the knee that bends - the other leg stays completely straight.

  • As you step side, hinge your hips: booty back, head forward, spine straight!

  • If you hinge your hips correctly, your upper back shouldn’t round over, nor should your shoulders collapse down in front of your chest.

  • Pull your rib cage inward - avoid letting it “puff out” excessively - to properly engage your core.

  • Load the heel of the foot that you stepped on - to properly engage the booty.

  • If your knee is poking forward excessively/you feel the majority of your weight shifting into the front of your foot, stick your butt back farther!! Don't be afraid to let your chest face slightly downward in order to do this. So long as your spine is straight you're good!

  • Drive through the heel of your foot [of the knee that’s bent], to initiate standing back up again. Push with power & move with enough speed to give you the momentum to move that foot back beside the other & stand all the way upright again.

Now let's talk about the 2nd half of the workout

Sumo Squats: work your legs & booty with an emphasis on your inner & outer thighs [adductors & abductors]. Start standing with your feet wide & toes turned out. As you squat down, press your knees open wide so that you feel your hips working. As you stand up, act as if you were trying to glide your legs together like Michael Jackson!! Just don’t actually let your feet move - LOL! The intention is to feel your inner thighs engage as much as possible!

Sumo Squat Hold + Pivots to Lunge: builds endurance in your legs while improving core & hip stability. Always keep your rib cage compressed toward your spine & lower abdominals pulled tight so that your pelvis stays neutral & your lower back doesn’t arch - especially when you pivot to your lunges. When you drop your knee down to a lunge, be sure to twist your whole torso to face that direction. Your shoulders & pelvis should always move together! ALSO! Whichever knee drops down when you lunge - squeeze that butt cheek nice & tight ;-) That’s another way to ensure that you’re keeping your hip stable & posture in check!

That's it! Now let's just do it!

[Day 3] 100 REPS A DAY TO B STRONG 10 DAY CHALLENGE

DAY 3 - MAT WORK - UPPER BODY

challengeday3.png

In this workout we’re doing hand-release push-ups. Why?? They’re an effective way to build up strength & practice proper form through the *full range of motion* of a push-up, [which you eventually want to do properly - without resting on your belly at the bottom ;-) ]. Focus on lowering yourself so that your entire body reaches the floor at the same time - avoid letting your hips sag & touch the ground before anything else. Then reverse it! Press everything up all at once & avoid any worm-like action ;-)

FYI --- Another helpful way to build up strength if you struggle with push-ups, [the struggle is SO real btw], is to elevate your hands. The higher you elevate them, the easier. Start with your hands on a countertop; then progress to a bench/chair; then the bottom step of a staircase; then shoot for the real deal!

No matter what variation of push-ups you’re doing, remember that they’re a moving plank, so:

  • lats engaged [pull your shoulders away from your ears - "un-shrug" them]

  • lower abs tight & butt squeezed to keep pelvis neutral

  • heels driving back so that all 5 toes press into the ground & quads [front of thighs] engage

  • gaze at the floor

WHY DO PLANKS / PUSH-UPS HURT MY WRISTS?!

  1. It’s all about alignment, baby ;-) When you’re in a plank, you should have a straight line from your shoulders to your elbows to your wrists... as well as from your shoulders to your hips to your heels. When those straight lines become curvy, your wrists will let you know immediately - LOL. One of the worst ones I see with exercises like mountain climbers & face melters is the shoulders moving forward & ahead of the wrists. This is bending them backward [yikes!] - which is obviously super uncomfortable!! So when you’re moving in a plank, be sure to stay static - move in place.

  2. Engage your *whole* hand! Oftentimes, without even realizing, people will create a ton of torque in their wrist joint because they sit all the weight they’re holding up in the heels of their palms... like when you’re super fatigued & practically clawing your fingertips into the floor out of pure desperation - hahaha. So, intentionally press your entire palm & the ends of your fingers into the ground to engage the muscles that stabilize your wrists.

  3. If necessary, do it with your hands on a flat, hard surface. For some of us, the cushioning of a mat/rug may work against us when it comes to keeping our wrists properly stabilized. Go ahead & keep your knees over the mat, but walk your hands forward so that they’re on the flat, hard floor.

  4. And if worse comes to worse, try doing it on your fists! It sounds WAY riskier than it is - I do it often. But definitely be sure to squeeze your fists tight for the same reason as #2 - you want to be sure your wrists are supported. [Another similar but less nerve-wracking option is to hold onto the handles of dumbbells, which will take the pressure off your knuckles if that's preferred!]

Superman + Lat Pullback Combo: while you are moving your back into hyperextension, [letting your back arch], your focus is less on arching & more on reaching. As you lift, your goal is to lengthen. Create the longest possible line from your fingertips to your toes! And per usual - engage your lats [shoulders away from ears - even when you reach forward!] & squeeze your butt ;-)

OK, I think that's enough coaching... it's time to start DOING! Let's get to work!

[Day 2] 100 REPS A DAY TO B STRONG 10 DAY CHALLENGE

DAY 2 - MAT WORK - LEGS & GLUTES

challengeday2.png

All of these exercises work the booty… but different muscles within the group that makes up our “glutes”. Here’s what each exercise targets & why being sure to target each muscle is so important:

Glute Bridge + March Combo

Bridges work the big guy - your Gluteus Maximus. You should feel this right in the meaty part of your buns - haha. Keep your abdominals engaged to prevent your lower back from arching & actively squeeze your cheeks at the top. For the marches, your goal is to keep your abdominals engaged & your hips side-by-side, [avoid letting the hip of the lifted leg sag toward the floor].

Kneeling Rainbow Leg Lifts

Work the top side of those sweet cheeks ;-) your Gluteus Minimus. You should feel this exercise more toward the top of your booty, just behind your hips. Lift your leg as far as you can without arching your lower back or bending that knee. [Pro Tip: It's essential to work this area in order to achieve a round backside!]

Mat work for the glutes can help improve:

  • Poor Posture

  • Low Back Pain/Tightness

  • Tight IT bands

  • Tight Hamstrings

  • Hip Pain/Tightness

  • Knee Pain

Pair 2 exercises that work the entire muscle group like this & you’ll build a butt that’s BIG. ROUND. And OUT THERE! #BabyGotBack

But wait! There's more! Exercises like these can help to balance out your body & alleviate, [& possibly eliminate!], some of the aches & pains I listed above!! HOW?!?! Well, we spend way TOO MUCH time sitting - usually with poor posture [back rounded over, shoulders & head collapsing forward]. This can cause constant pulling & uncomfortable tension in our lower back that can ultimately travel to our hips, knees & all the way to our feet... yikes... On top of that, the average person’s daily activities neglect the posterior chain, [back, butt & hamstrings], BIG TIME. So not only is our crap posture making us TIGHT, but our lack of activity is making us WEAK in our backside too.

* TIGHTNESS + WEAKNESS = IMBALANCED TENSION === PAIN/DISCOMFORT *

Plus, we sit on our backside constantly, so it’s often coping with lots of pressure that could inhibit circulation - boosting blood flow on a regular basis is important for that reason alone!!

Long story short: show your backside some action. It deserves love too - LOL!

[Day 1] 100 REPS A DAY TO B STRONG 10 DAY CHALLENGE

DAY 1 - MAT WORK - CORE

challengeday1.png

HERE’S A 60SEC VIDEO THAT DEMONSTRATES EACH MOVEMENT:

Does the 1st exercise leave you wondering... "WHY DO AB EXERCISES KILL MY NECK?!"

  1. Check your posture!

    First off, compress your ribs & press your lower back toward the floor to prevent arching in your lower back. And remember that your neck is also part of your spine! If it often aches while doing ab exercises, you may be sticking your chin out like a pigeon does when it walks - haha - OR pulling your chin down to your chest. This hyperextends & fatigues the muscles that support your head. Instead, stabilize your neck & initiate crunching movements by lifting your shoulder blades off the ground. Your head is attached to your shoulders, so it’ll follow automatically ;-)

  2. Make sure you’re engaging your lats.

    This is CRUCIAL for every exercise EVER. To engage your lats, do the opposite of shrugging your shoulders, [broaden them as you pull them down & away from your ears]. If your lats disengage, your shoulders will collapse forward & lift toward your head, which creates tension in your neck, chest & shoulders. Pulling that tension down into your powerhouse is not only going to reduce tension in your neck, it’s going to properly load your abdominals so that you’re actually strengthening them with the exercise.

  3. Use your strength to control the movement at all times!

    Using momentum to crunch by throwing your head &/or arms forward is basically giving yourself whip lash - HA! With these cross over crunches, how much you lift up is 100% dictated by your abdominal strength. Initially, you may only be able to lift your head & the top of your shoulder... but you’ll improve more quickly than you think - so long as you follow all the tips above :-D

Now let’s make sure we’re doing the other exercises correctly too!

Bird Dog Crunches

Bird Dogs are an anti-rotation core training exercise. I love them because they’re a great way to build body awareness around core engagement - which can be a whole lot harder to focus on when you’re laying on your back struggling through crunches or leg lifts. They’re also great - when done correctly, of course ;-) - for people who struggle with lower back pain. When you reach your arm & leg, be sure to squeeze the booty of the lifting leg & engage the lat, [unshrug the shoulder], of the reaching arm. When you crunch your knee & elbow under your torso, focus on moving with strength & control so that you're able to keep your hips & shoulders square to the ground as you round your back & crunch your abdominals.

Plank Drill

The side planks are another great opportunity to practice keeping your lats engaged [shoulders "unshrugged"] to build stability in your shoulders & core. For the oblique crunches, your goal is to crunch your knee to the side without letting your hips get out of place. If our hips lift above our shoulders, it shifts tension out of our abs & into our neck... & if our hips sag too low, it shifts tension out of our abs & into our lower back. The goal is to keep the tension in our lats & abdominals at all times!

Ok! You've got all the tools you need to CRUSH this workout - LET’S GET IT!!